Saturday, December 29, 2012
Side Curtains and Topbows
A couple things going on in the shop today. The car came with side curtain frames. Unfortunately, the one for the left was the proper short version for this early 120 and the other side was for a later version. So using the left for a pattern, I cut and slightly reshaped the right to match. Since it was longer, small pieces were cut out and the frames and then it was rewelded.
The other thing going on was that I got the rivets for the latches for the top bows and peened them into position. Its all pretty stiff right now but I suspect that it will loosen up just fine when it eventually gets some use. There are a number of pieces that are unique to the early version short top that are not available as replacement parts by the domestic parts suppliers: the top bow attachment bolts and the spacer washers. Later version parts don't fit so I'll have to see if mine can be reconditioned and chromed.
Saturday, December 22, 2012
Top Bows
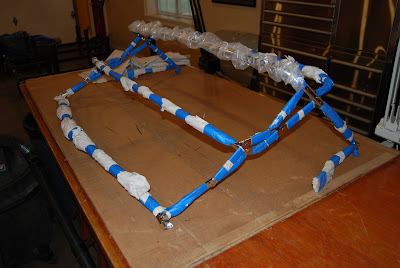
A couple weeks back I got the chrome done on the top bows so I have been assembling them. The trouble is that these require what is called 1/4" 60 degree countersunk rivets. Nobody makes them anymore. And since this is for an early car that has the chromed top bows, the rivets need to be stainless steel. So I set up my little hand drill in the vise with a round head rivet using it like a lathe then shaped the head into a countersunk type of 60 degrees. The wrapping paper and tape is used to protect the chrome surface while I am driving the rivets into place. Big pieces are all in place with just the latches used to fasten the top bows to the windscreen still needed.
Also, today I took the grill to the chromer to have the pieces polished prior to soldering and fitting to the hood.
Sunday, December 2, 2012
Grill Continued
The festivities dealing with the shaping of the grill vanes continues. I discovered the best way of shaping the brass over the form that I made was to shrink the metal once the curve was formed with wooden hammers rather than metal. I used my woodworking hammers that are typically used for cuting with wood chisels. The big benefit is that there are not indentations caused by the metal hammers that have to be filed out later.
None of this is attached yet, so the wood spacers are used to hold position and gives a chance to look at it from both sides. There is still a lot to do here. The new vanes need to be trimmed at the lower edge. The original vanes need to be removed, straightened , and then the old and new need to be polished by the chromer. The studs need to be replaced. Then the vanes need to be attached to the surround and finally the assembly goes back to the chromer. This is much more labor-intensive than I would have guessed but I think it will look original when it is finished. Hopefully.
Sunday, November 25, 2012
Chrome Bits
The first two shots are of a bunch of chrome bits that have returned from the rechroming shop. These were done by South Shore Plating and look great. Mostly these pieces are the convertible top frame and the windshield frame with a couple odds and ends.
The third and forth shots are of the grill with the chrome removed. I am going to try to repair this believe it or not.
The fifth photo is of a pattern that I made out of 1/8" steel. It has a radius of 22.5" and the notches that are on either side are to allow clamps to hold down a piece of 1/32" x 1-3/4"x 24" flat brass. The brass is annealed then folded over and hammered flat on the sides. This was my trial run and was giving me so much trouble prior to the annealing that I was ready to give up. After the annealing, it formed very quickly although I was too aggressive and made dents in the sides that are hard to smooth over. This was practice, but I think the process will work. O down and nine to go.
Thursday, November 22, 2012
Body Jig Continued
This should help explain a few of the things referenced in the last post. The body jig is pretty much done now except for the front vertical supports. I need to make a few measurements on the frame that is currently away at camp to finish those. The way the fittings work, both the horizontal and vertical tubes can slide allowing a great variety of possible attachment points on different cars as well as different heights. At the lowest setting, the bottom of the xk120 body will be at about 20 inches off the floor and the adjustment to the verticals will allow it to be moved up by 9 inches. The whole assembly is quite rigid and should work well. Now if I can just get the body back.
Saturday, November 10, 2012
Body Jig
On XKlovers, in the library section, there is body jig diagram that looks very well designed. It was constructed of a bunch of 2-1/2" x 2-1/2" x 3/16" TS fittings that were adjustable over a set of TS2x2x3/16" runners ,cross rails, and uprights. I started with that design and to make it even more adjustable, I used the same type of adjustable fittings to support the 8" casters which will allow them to slide on the long rails. Then (I don't have the TS2x2x3/16" stock yet) I intend to make the uprights also able to slide vertically so it will fit the Jag but should also be adaptable easily to about any car body. I will explain more of this when I get the 2x2 stock.
My welding is getting a bit better. Still looks bad but is holding well.
Saturday, July 7, 2012
Right Rear Fender in Primer
I know that there are those out there who think that sanding parties are fruitless fun ending in nothing useful, but you would be wrong.
The sanding parties actually lead to something- painting parties.
These shots don't really show all of the fun that was had. First, this bit of original steel was blasted on the back side, then sanded, then the rust pits were filled with a glazing compound, and then sanded again. The outside was sanded to within an inch of its life to get down to clean metal, then filler was added to quite a lot of the surface, then sanded, then glazed, then sanded again. Both sides were then cleaned, an epoxy primer was mixed up, I put on my moon suit and respirator and finally primed it. What I am trying to do here is block out the panels where I can but more importantly, to get the raw steel protected
Subscribe to:
Posts (Atom)