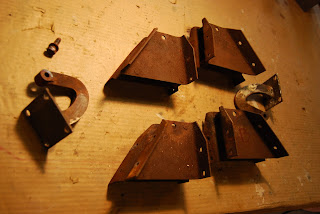
 The door hinges and hinge boxes have finally been removed from the front section. In order to get them out, the door pillar structure had to be cut away in part. These structures support the door shut pillars as well as act as the firewall assembly. They are rusted through and need to be replaced anyway. The hinges are a notoriously poorly designed part of this car. The hinge pins are supposed to remain solid on the box and the hinge arm rotates on the pin. The problem is that the pin rusts solid on the arm and then it starts to rotate on the box. There is very little meat on the box and it starts enlarge the hole and cut into the pin. Result- a very sloppy door fit if at all possible.
 Saturday, April 30, 2011
Door Hinges
 The door hinges and hinge boxes have finally been removed from the front section. In order to get them out, the door pillar structure had to be cut away in part. These structures support the door shut pillars as well as act as the firewall assembly. They are rusted through and need to be replaced anyway. The hinges are a notoriously poorly designed part of this car. The hinge pins are supposed to remain solid on the box and the hinge arm rotates on the pin. The problem is that the pin rusts solid on the arm and then it starts to rotate on the box. There is very little meat on the box and it starts enlarge the hole and cut into the pin. Result- a very sloppy door fit if at all possible.
 Friday, April 22, 2011
Radiator 2
Radiator
 I decided to restore the old copper radiator and was lucky enough to find a guy locally who still does this stuff. The copper core is being replaced entirely, so to remove it, the top, bottom and sides are all removed and then were glass bead blasted. Note the sides are steel and actually rusted through in places and will be replaced completely. Everything else is brass. The top and bottom are pretty dented and while it is all apart is the time to do some smoothing.
 Sunday, April 17, 2011
Engine bay side cover.
 The engine bay side covers had small stress cracks at the top edges that were repaired. Also, I had the welder add little triangular pieces to the top edge where they were originally separated. Because of the separation, the two sides were free to move or vibrate individually and caused the stress cracks. They then went in for some industrial smoothing and priming. I actually had a visitor for the smoothing party today but suspect it was more about the refreshments than the actual smoothing.
 Jack access plate
 There are a couple of places in the plywood floor of this car where a rubber cover is removed from a metal reinforcing plate mounted onto the plywood to access the point on the frame where the jack can be installed. The ones that came with the car were good for patterns to make the new ones you see here but were too rusty to be reused. So they are cut out, sanded, then primed.
Manifold water inlet
 This is the intake manifold water inlet. It houses the electric choke switch called an otter switch. When I took this apart some months ago, I snapped off a couple of the screws holding the switch and buggered one of the holes pretty good. So it was off to the welder and weld the hole shut then retap for the screw. The weld had to be reshaped, then the housing was polished, the hole tapped and the otter switch reinstalled.
Sunday, April 3, 2011
Driveshaft tunnel

A festive celebration of all things abrasive was recently held with the driveshaft tunnel as the featured guest. Just to keep you on your toes the after shots come first. The main thing happening here is that the rust pitting is being filled with a polyester filler over bare metal, then smoothed and primed. I expect that this will all be sanded essentially down to the filler again then epoxy primed once I get this to a professional shop. The light coat of rattle-can primer that is on now is just to stop flash rusting.
Saturday, April 2, 2011
Year one
Subscribe to:
Comments (Atom)


