On with other news, the block went to the machine shop today to be hot tanked, then magna-fluxed and then pressurized to check porosity. The engine was setting for so long with water in it that before a bundle is spent on it, I want to make certain that there isn't something hiding that will cause headaches
Saturday, July 31, 2010
My air compressor motor burned out so I am temporarily out of business with the sand-blaster
. Unfortunately it stopped half way through the left hand rear leaf spring. The right side however is mounted and the bolts are all snugged up. They don't get tightened up for good until the full weight of the car is on them. It is so wonderful to see something reattached to the frame. We are starting to go in the right direction. Tomorrow the rear axle gets fluids and grease. I don't remember if it was said earlier, but all bearings and seals have been replaced. Lash and end float are good. And it is clean and shiny.
On with other news, the block went to the machine shop today to be hot tanked, then magna-fluxed and then pressurized to check porosity. The engine was setting for so long with water in it that before a bundle is spent on it, I want to make certain that there isn't something hiding that will cause headaches
later. Also the front brake drums were getting turned, the right stub axle was getting pushed out (that was the one that was burnt), and the idler arm of the steering box was getting pulled off so disassembly of could start. The machinist confirmed my fears that the crankshaft was not restorable. I will need to find the lower end from a later car. I'm told that the rods from XJ-6's will fit. I don't know if the crank will as well.
On with other news, the block went to the machine shop today to be hot tanked, then magna-fluxed and then pressurized to check porosity. The engine was setting for so long with water in it that before a bundle is spent on it, I want to make certain that there isn't something hiding that will cause headaches
Rear axle assembly
I was able to finally get the wheel lug studs mounted into the half shaft of the axle, so I was then able to
finish assembly of the axle itself. Everything went back together well. End float is at 0.003, exactly where it should be. Contrary to what I found here initially, the shims on each side are balanced now, the leaf spring mounts are recentered, and the leaf spring itself has been repaired. When the leaf was apart, all individual leafs were cleaned, painted, then greased. So exciting.

Tuesday, July 27, 2010
More pistons
Rods and Pistons
My follower recently complained that I was not doing an adequate job of blogging of late. So, Peter
Wednesday, July 21, 2010
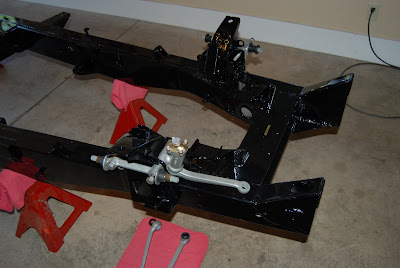
The painted frame
Sunday, July 18, 2010
More crankshaft
The front crank journal
. The gear to the left is the drive gear for the oil pump and the distributer. Seem ok except that I can't get it off.
Next shot is of exploded trans bits and the timing chain cluster.

Rear axle partially assembled. I am waiting for the correct wheel studs. The wheel studs need to be on the axle half-shafts prior to reassembly.
The bottom end of the block. I am trying to soak the pistons in penetrating oil to get them free.
Next shot is of exploded trans bits and the timing chain cluster.
The bottom end of the block. I am trying to soak the pistons in penetrating oil to get them free.
Crankshaft
The next shots are of the crank journals. Lordy. They have been machined to 0.020 oversize aleady and will require
Sunday, July 4, 2010
Transmission removed
It turns out that the trans is a JL series as opposed to the
proper JH. The top plate (with the serial number) has apparently been retained and put on a different lower case. When drained, the remaining oil from the case sparkled like metallic paint. I think I will scrap this in favor of a new 5-speed. The main difference between the JL and the JH trans is the length of the mainshaft. The JL is shorter and requires a longer drive shaft. I have a proper JH trans also, but its innerds, particularly the mainshaft, are shot.
Next shot is of the exposed clutch assembly. Teeth on the flywheel have seen better
days.
Third shot shows the back of the crankshaft once the flywheel is removed. Amazing. Looks like someone beat the hell out of it with a large axe.
Finally, the harmonic ballancer and the front engine support are off. Two out of five studs holding the support to the block are sheared off in the block. Two others are bent.The support itself has had another plate welded on top. Something gives me this creepy feeling that this sort of mecanical work will continue into the block.


Next shot is of the exposed clutch assembly. Teeth on the flywheel have seen better
Third shot shows the back of the crankshaft once the flywheel is removed. Amazing. Looks like someone beat the hell out of it with a large axe.
Finally, the harmonic ballancer and the front engine support are off. Two out of five studs holding the support to the block are sheared off in the block. Two others are bent.The support itself has had another plate welded on top. Something gives me this creepy feeling that this sort of mecanical work will continue into the block.
Friday, July 2, 2010
Subscribe to:
Posts (Atom)