Saturday, December 29, 2012
Side Curtains and Topbows
A couple things going on in the shop today. The car came with side curtain frames. Unfortunately, the one for the left was the proper short version for this early 120 and the other side was for a later version. So using the left for a pattern, I cut and slightly reshaped the right to match. Since it was longer, small pieces were cut out and the frames and then it was rewelded.
The other thing going on was that I got the rivets for the latches for the top bows and peened them into position. Its all pretty stiff right now but I suspect that it will loosen up just fine when it eventually gets some use. There are a number of pieces that are unique to the early version short top that are not available as replacement parts by the domestic parts suppliers: the top bow attachment bolts and the spacer washers. Later version parts don't fit so I'll have to see if mine can be reconditioned and chromed.
Saturday, December 22, 2012
Top Bows
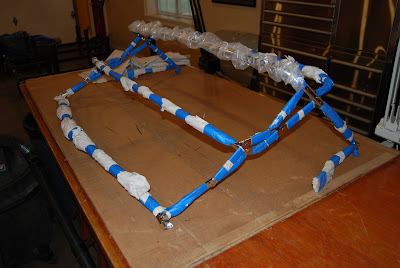
A couple weeks back I got the chrome done on the top bows so I have been assembling them. The trouble is that these require what is called 1/4" 60 degree countersunk rivets. Nobody makes them anymore. And since this is for an early car that has the chromed top bows, the rivets need to be stainless steel. So I set up my little hand drill in the vise with a round head rivet using it like a lathe then shaped the head into a countersunk type of 60 degrees. The wrapping paper and tape is used to protect the chrome surface while I am driving the rivets into place. Big pieces are all in place with just the latches used to fasten the top bows to the windscreen still needed.
Also, today I took the grill to the chromer to have the pieces polished prior to soldering and fitting to the hood.
Sunday, December 2, 2012
Grill Continued
The festivities dealing with the shaping of the grill vanes continues. I discovered the best way of shaping the brass over the form that I made was to shrink the metal once the curve was formed with wooden hammers rather than metal. I used my woodworking hammers that are typically used for cuting with wood chisels. The big benefit is that there are not indentations caused by the metal hammers that have to be filed out later.
None of this is attached yet, so the wood spacers are used to hold position and gives a chance to look at it from both sides. There is still a lot to do here. The new vanes need to be trimmed at the lower edge. The original vanes need to be removed, straightened , and then the old and new need to be polished by the chromer. The studs need to be replaced. Then the vanes need to be attached to the surround and finally the assembly goes back to the chromer. This is much more labor-intensive than I would have guessed but I think it will look original when it is finished. Hopefully.
Subscribe to:
Posts (Atom)